PREPARATION FOR GRINDING
- Completely cool the Rubber Belt (RB) before grinding.
- Measure and record the RB thickness and durometer (hardness).
- Check the inside of the RB for any buildup of material and remove if found. Pay special attention to the compression roll. Hollow spots will be ground into the surface of the rubber belt if any buildup exists on this roll.
- Dust the inner and outer surfaces of the RB, when dry, with talcum powder. (NOTE: When dry grinding no water is used on either the inside or outside belt surface).
- Check the condition of the grinding cloth and grinding roll. Make sure the cloth is tight and there are no overlaps or gaps between wraps. Also check that the cloth is truly continuous, without seams or splices. (NOTE: The standard abrasive used is 60-80 grit (USA standard)).
- Make sure the grinding roll is parallel to the compression roll and that the compression roll is also parallel to the steam cylinder on both sides. (Use interior calipers or a slide gauge between both rolls to confirm this setting).
- The compression roll should be set at zero (no compression). The grinding roll should not be touching the RB at this stage, but located 1/8″ (3mm) away. (Note: The significance of this setting is to insure that the RB is moved to the grinding roll when the grinding begins. You cannot move the grinding roll into the belt).
- Increase Rubber Belt Tension. This flattens the edges of the RB to insure an even grind across the entire belt. (Note: The use of a straight edge can be beneficial. Lay it on the RB face hanging over its edge. Increase the tension until the gap between the straight edge and RB is removed or at least greatly minimized).
- Bring the water removal rolls in light contact with the belt. This helps keep the belt steady during grinding.
Note: It is recommended that an ammeter be used as a guide for controlling the grinding operation. An ammeter monitors the amount of pressure applied by the Grinding Roll. Excessive pressure can result in chatter marks on the belt’s surface and other undesirable effects.
GRINDING
- Start the RB machine at a slow speed, approximately (5) yards per minute.
- Start the grinding roll. Its speed should be approximately 1750 RPM. (NOTE: As a precautionary measure, we recommend that all subsequent starts of the RB and grinding roll be in the order described above. Conversely, all stops should be in the opposite order, i.e., stop the grinding roll completely before the RB).
- Take note of the “no load” reading of the ammeter. This varies per machine, but should be close to (5) amps.
- Slowly back the compression roll towards the stationary-grinding roll until the ammeter reads a steady (10-12) amps. Continue grinding until the ammeter approaches its initial “no load” reading.
- HINT: Although the Grinding Cloth (Rubber Belt Maintenance Products) is designed to be used with very little talc through the course of a RB grind, it is usually a good idea to add ample talcum powder for the first (10-15) minutes of the grinding operation. This prevents the grinding cloth from loading up if the surface of the RB is sticky or gummy.
- Continue feeding the RB towards the grinding roll, as outlined in No. 4 above, until the belt achieves a “new” surface appearance.
- Once the RB has this “new” appearance, stop both the grinding roll and the RB machine, as outlined in No. 2 above, in order to check the durometer or hardness of the RB.
- Using an “A”-type durometer, check the RB to see if it has reached the desired hardness. (NOTE: The desired hardness equals the belts original durometer when new. Check the retained copy of the “Certificate of Compliance” that was included in the Informational Packet adhered to the belts plastic wrap).
- It is very important to check the durometer across the entire belt width in 50mm (2″) increments. Pay special attention to the hardness of the belt in the selvage area.
- For a correct and complete grind, the hardness of the RB must be returned to its original reading and should be consistent across the entire width.
- If the hardness has not been rejuvenated, continue the grinding operation until this is achieved.
- After renewing the entire surface of the belt, the grinding roll and RB should be allowed to run with light contact for about (10-15) minutes, without further feeding of the RB against the grinder. (NOTE: A light dusting of talc, applied as a lubricant during this stage, will greatly aid in obtaining a fine surface finish).
AFTER GRINDING
- After grinding is accomplished, move the RB away from the grinding roll. Stop both the grinding roll and the RB machine.
- Check the RB edges for breaks or cracks and remove any found. Round off the edges of the RB using a belt or circular sander.
- Clean the entire machine, removing all loose rubber particles and talc from inside and outside the RB and surrounding area.
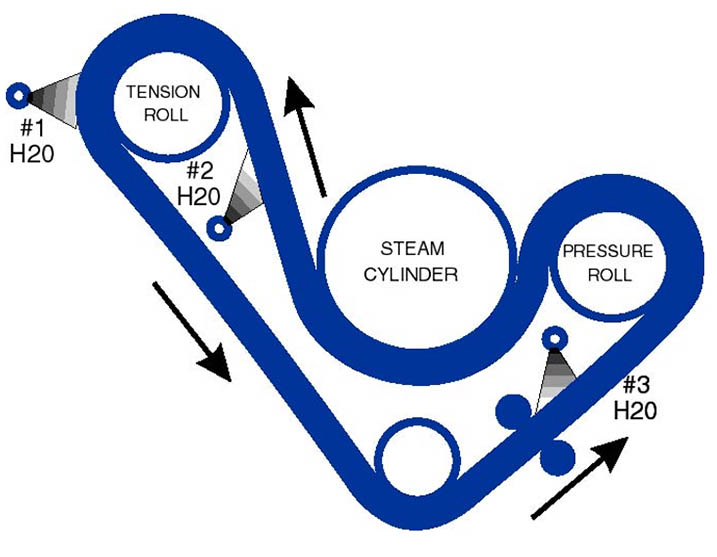
- Check all rolls, including the guide or stop rolls for bearing failure. Check all water lines for proper operation and direction of water flow. (Cross sectional Rubber Belt unit diagram). Check felt doctor blade or brush for proper position.
- Reset Rubber Belt Tension. (Tensioning a Rubber Belt).
- Adjust Shrinkage Control Plate to “0” setting. Use calipers to determine the new thickness of the RB. Move the compression roll this exact distance from the steam cylinder, being sure both sides are equal-distant. Move the shrinkage control plate to “0” and tighten.
- Wash the RB (Procedure For Cleaning A Rubber Belt) with a non-chlorinated soap, such as “Borax”. (Rubber Belt Maintenance Products). Cleaning the RB after grinding relieves surface tension, allowing the cooling water to better adhere to the belt.
- Record the RB’s thickness and durometer. (Download DUNLINEâ Belt Record keeping format)
THE RUBBER BELT IS NOW READY FOR USE.